Jira integration
Jira offers powerful and flexible automation to handle FastCron cronjob notifications. Follow the instructions to process cron notifications via Jira automation:
Create an automation rule
- Log in to your Jira account
- Visit Project settings > Automation
- Click Create rule
- Search and select Incoming webhook for the trigger
 Now you’ll get an incoming webhook URL that allows FastCron to send cron notifications to your Jira project.
The URL looks like this:
Now you’ll get an incoming webhook URL that allows FastCron to send cron notifications to your Jira project.
The URL looks like this:
https://automation.atlassian.com/pro/hooks/SOMESECRETKEYAdd an action to your automation rule
Jira is so flexible that there are many ways to process the cron notifications. You can make it send notifications to your team, add a new issue, or comment on an existing issue.
It’s up to you to set up the action. The webhook data is the same with our webhook payload:
{ "output": "<!doctype html>\n<html>\n ... </html>\n", "downloaded": 1256, "httpStatus": 404, "error": "", "time": 1720409270, "executionTime": 0.02, "status": 1, "message": "fails", "id": 16910124, "name": null, "url": "https://example.com/404", "group": ""}At Jira, you can use {{webhookData.*}} to access them e.g. {{webhookData.id}}, {{webhookData.name}}, {{webhookData.url}}, etc.
In this guide, I’ll set it up to add a comment on an existing issue:
- Create a dedicated issue to handle your cronjob notifications, e.g. CRON-1
- At the Automation rule trigger screen, select Execute this automation rule with: Issues provided in the webhook HTTP POST body.
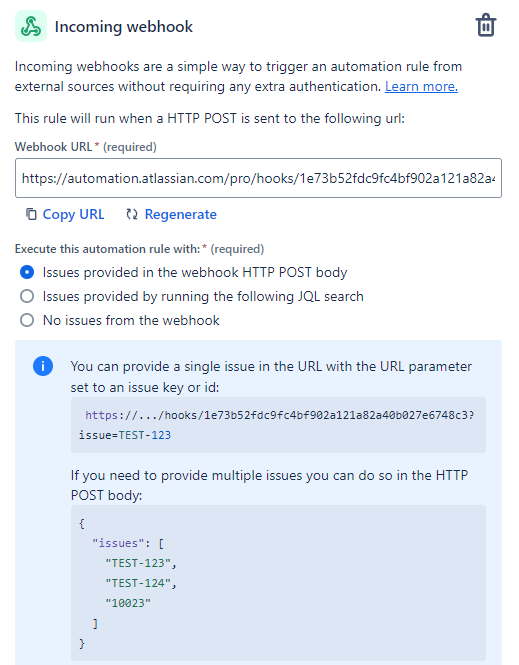
- This requires you to add your issue ID to the webhook URL like this:
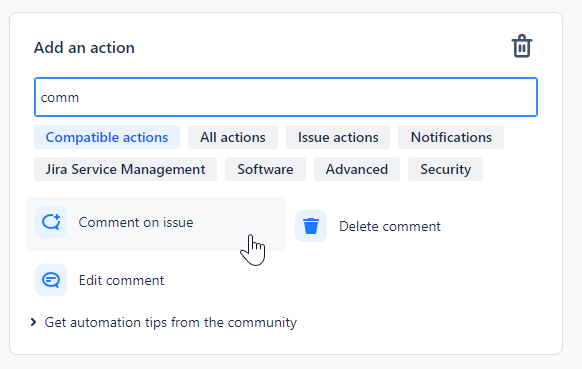
https://automation.atlassian.com/pro/hooks/SOMESECRETKEY?issue=CRON-1- Click Next, and select THEN: Add an action

- Search and select Comment on an issue
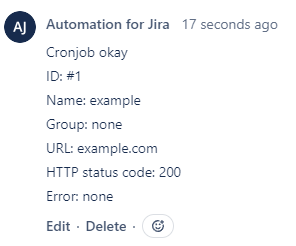
- Add comment message
Cronjob {{webhookData.message}}ID: #{{webhookData.id}}Name: {{webhookData.name}}Group: {{webhookData.group}}URL: {{webhookData.url}}HTTP status code: {{webhookData.httpStatus}}Error: {{webhookData.error}}- Uncheck Prevent duplicates by only adding this comment once to a particular issue.
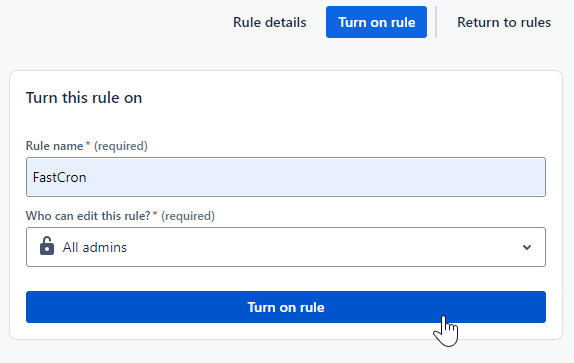
- Click Next, then Turn on rule
- Enter a name e.g. FastCron, then click Turn on rule.
Add it to your account Channels
- Log in to your FastCron account
- Click the tab Channels on your account dashboard.
- Click Add channel > Jira.
- Paste the webhook URL
https://automation.atlassian.com/pro/hooks/SOMESECRETKEY?issue=CRON-1- Then click Save.
Check your Jira issue and see if a new comment is added.
Enable notifications for your cronjobs
FastCron enables notifications for your cronjobs by default.
To check it, edit cronjobs, in the section Notifications, ensure the Notify me: when cronjob fails, and when cronjob succeeds after failed are checked.
FastCron will post to your webhook URL when a cronjob in your account fails, and when it succeeds again.